woensdag 26 februari 2014

New Heartfelt Inspirations again :))

This week I want to share 3 new projects with you :) I hope you enjoy them.
Thanx for visiting me :)



Project Instructions:
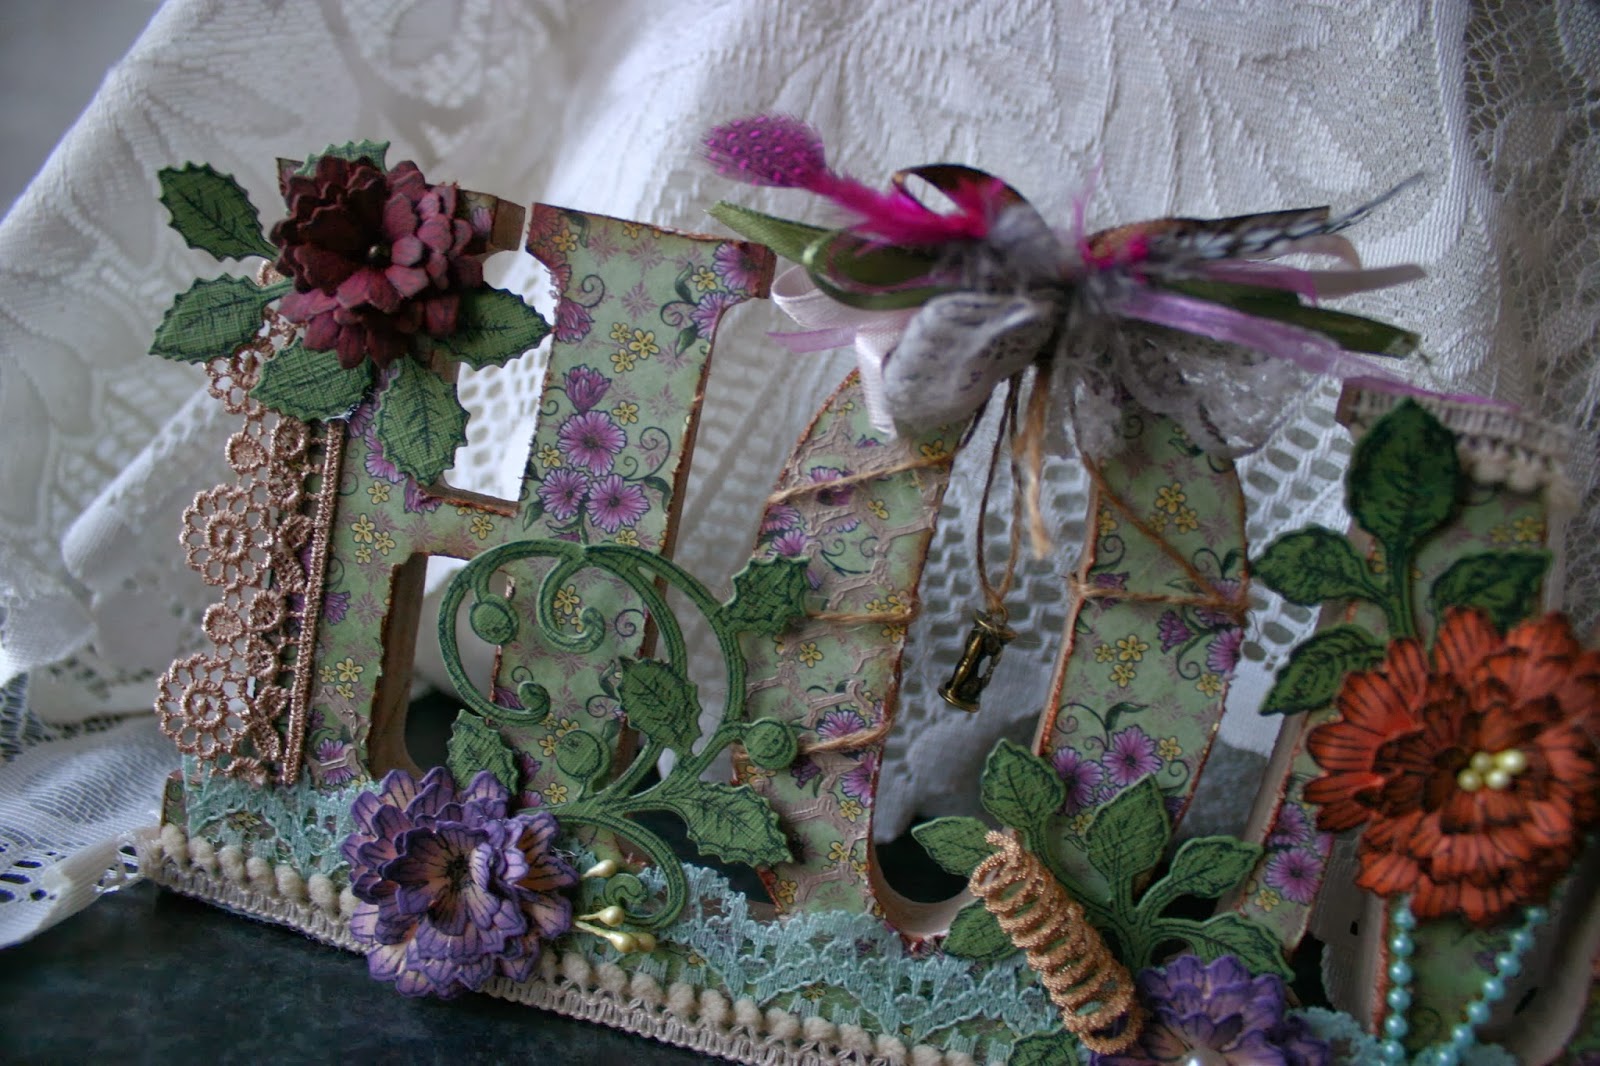
Other Products: Vintage photo distress ink, hot glue gun, lace, black memento ink, flatback pearls, pearl string, charm, feathers, organza ribbon, mini bowdabra.

Instructions: Click here to view a larger project image. This is an easy one this time. Just buy any MDF text you like from your favorite store and let your fantasy take over and decorate anyway you like. With a pencil draw the lines of the text you have bought/chosen on one of the lovely Raindrops on Roses paper and cut it neatly with a scissor/knife. I have distressed all the edges and inked the edges with vintage photo distress ink. Cut and emboss several flowers from the Majestic Blooms Die and ink the flowers with the Majestic Morning Background PreCut Set. Also the edges of the flowers have been inked just to get that special touch. Take different pieces of lace you like and decorate your text with it at several places. I used 2 sorts of laces for the bottom to create a layer. The bow was made using the mini bowdabra using different kinds of materials. Cut and emboss some leaves and ink them. Glue the leaves and flowers where you like them. Finish with some embellishments and one of the cute die cut texts from the Raindrops on Roses Paper Collection.


Project Instructions:
Other Products: Brown card stock (CS), vintage photo distress ink, hot glue gun, lace, bandage, flatback pearls, own made headpin.

Instructions: Start by making a base card from brown card stock 5,9" x 4,7" (15 cm x 12 cm) and ink the edges. Cut a piece of green patterned paper slightly smaller than the base and distress and ink the edges. Die cut the decorative Raindrops on Roses die, ink the edges and cut the die in half and use the first half to glue under the green patterned paper on the left. Use the other half for the right side to glue on one of your rectangles. Cut 3 pieces of decorative rectangles from the patterned paper put them in layers any way you like and adhere to the green layer with glue. Distress each paper you use and ink the edges. Place some bandage anywhere you like and glue the lace on top of the window. Then add the pearls with glue. Cut some flowers from the Delicate Asters Die and just ink the end of the petals. Ink the flowers with the Delicate Asters PreCut Set. Glue the leave first and add the flowers to you own need.


Project Instructions:
Other Products: Dark red and creme card stock (CS), vintage photo distress ink, hot glue gun, glue, brads, metal embellishment corner, ribbon, eyelet.

Instructions: This time it is time for a waterfall card. Start by making a base card from dark red card stock 5.9" x 4.1" (15 cm x 10,5 cm) and ink the edges. Cut a piece of creme card stock slightly smaller than the base and ink the edges. Choose one of the die cuts from the Raindrops on Roses Paper Collection and make it slightly smaller than the creme cardstock. Ink the edges. Cut another piece of creme card stock slightly smaller than the base and ink the edges and glue it to the back of your card. For the back of the card I also used one of the die cuts from this beautiful paper collection. Make sure it is slightly smaller than your creme cs. Cut a strip of card 3.7" x 0.87" (9 cm x 2 cm). Cut 4 square pieces of creme cardstock slightly smaller than your strip of card and ink the edges. Cut 4 of the square die cuts from your Raindrops on Roses Paper Collection and make them fit for the creme squares, ink the edges. Cut a strip of card 1.95" x 9.4" (5 cm x 24 cm). Use an embossing tool and ruler or score board to create 4 fold lines (0.87") on the largest area remaining I used the Raindrops on Roses Birthday PreCut Set. For the inside of the card I cut 2 pieces of creme cs and design paper from the Raindrops on Roses Paper Collection for decoration. For further instructions you can follow the tutorial here to create a waterfall card. The fun part is you can make it vertical or horizontal. I decided to make a vertical waterfall card.


woensdag 19 februari 2014

Time for Heartfelt Creations again :))

woww time really does fly. It's wednesday again..................:)))
 this time I made a simple but  lovely card with the beautiful Heartffelt Creations products.


Project Instructions:
Other Products: Green,brown and lila card stock (CS), vintage photo, dusty concord, peeled paint distress inks, flatback pearls, hot glue gun, black memento ink.

Instructions: Start with a folded 5,5 x 5,5 inch size brown card base. Cut a piece of green cardstock slightly smaller than the base. Cut another piece of lila cardstock smaller than the green cardstock and ink with the Vintage Closet Collage Precut Set. Choose of one the beautiful die cuts and place in the center of your card. Cut and emboss the doily from the Raindrops on Roses Die out of the DP paper, ink the edges and place in center of your die cut. Cut and ink the sentiment and place on your die. Cut and emboss several flowers from the Majestic Blooms Die and create lila and green flowers. I inked the edges with dusty concord distress ink and peeled paint distress ink. Cut and emboss the leaves 2 times from the Ornamental Add On Die and ink the edges with vintage photo distress ink. Place the flowers and leaves in both corners, adhere 2 flatback pearls and you are done.

woensdag 12 februari 2014

Inspiration time again with heartfelt Creations :))


Project Instructions:
Other Products: Brown and green card stock (CS), vintage photo and dusty concord distress ink, hot glue gun, lace, bandage, pearlen pen, pearl string, organza ribbons, frantage, HCD 702 Decorative Butterfly Border Die (retired).

Instructions: NOTE: The original tutorial is from Tina here. As always, I just modified my book card a bit to my own needs:) Start by cutting 4 pieces of brown cardstock :2 x 24 cm x 12,5 cm and 2 x 24 cm x 14, 5 cm score them all at every 2 cm. For the base, cut a piece of brown cardstock of 29,4 cm x 15 cm, score at 13,7 cm from the left and 13,7 cm from the right. Fold the first 4 pieces of paper in accordion style and ink the edges. I also inked the edges of the base card. Glue the 4 accordion folded papers together in a book shape. The "book" will be the last object to adhere. I choose 4 beautiful designs from the Raindrops on Roses Paper Collection to decorate my card and inked all the edges:) Cut 4 borders from the Decorative Butterfly-Border Die, ink the edges and adhere them in the corners.

For the inside of the book I used a stamp from the Lady Rosalie PreCut Set. I also put a little frantage in 2 corners. Before you adhere the "book" make sure you adhere the Die Cut first at the back. For the inside on the right, I cut a triangle of green cardstock, inked the edges, and then cut a triangle from the Raindrops on Roses Paper Collection. Only glue it on the bottom and on the left otherwise you will not be able to put a card or tag in it:) Choose one of the Die Cuts to place in the triangle and decorate with some nice organza ribbon, or small bow.

On the front side of the book, I cut a piece of green cardstock, added some lace on the right side, bandage on the left side, and then adhered the designer paper over it. For the front side of the book, I cut the beautiful doily Die from the Raindrops on Roses Die and yes I inked the edges again :) Stamp 3 times the largest leaves from the Classic Leaf PreCut Set, cut and emboss with the Classic Leaf Die, and ink edges. From one of them I just cut off some leaves and used them for the flower on top. Cut and Emboss the flowers from the Raindrops on Roses Die and create some flowers in different layers. Before I layered them I inked them first. With a pearlen pen I dropped some pearls in the center of the flowers. Choose one of the nice Die Cuts and adhere it with 3d foam pads and add some pearl strings beneath it.


Project Instructions:
Other Products: Purple, green and burgandy card stock (CS), dusty concord and peeled paint Wishing You Card Walletdistress inks, hot glue gun, flat back pearls, lace, bandage, black memento ink.

Instructions: For this wallet card, I used the basic instructions of this original tutorial. I only modified my card a bit to my own needs. Cut a 25 cm x 13 or 14 cm piece of purple cardstock and score it at 9 and 18 cm. For the part on top I used a corner punch for the nice roundings. Sponge the edges with dusty concord distress ink. For the strap I have cut a piece of 2,5 cm x 14 cm. Cut 6 pieces of green cardstock a bit smaller than your wallet sizes and ink them with peeled paint distress ink and adhere them to your base card. Pick some nice papers of the Raindrops on Roses Paper Collection and also cut 6 pieces again. Before you add the smallest piece on the inside make an opening first. Now you cut out two identical pieces of paper in size 10 x 8 cm. I chose the burgundy color. Then you fold the papers along the long side 10 times. (1cm x 10 times). Finally, you fold them so they look like two accordions. Now you can adhere them on the inside.

I made 2 cute cards for the inside using some Die Cuts from the Raindrops on Roses Paper Collection and a stamp from the Lady Rosalie PreCut Set. For the outside of the wallet card, I cut 4 flowers from the Majestic Blooms Die, layered them and added some stickles. I cut off some leaves from the Classic Leaf Die and put them under the flower. To close the wallet I have used 2 tiny strong magnets. Decorate the rest of the wallet card to your own needs and likes. :)


woensdag 29 januari 2014

2 new DT projects for this week :)


Project Instructions:
Other Products: Green and orange card stock (CS), vintage photo distress ink, flatback pearls, hot glue gun, black memento ink

Instructions: Cut a 21 x 15 cm (8,3 inch x 5,9 inch) card base from green cardstock. Cut a piece of patterned paper from the Majestic Morning Paper Collection slightly smaller than the base. Cut another piece of orange cardstock smaller than the patterned paper. Choose of one the beautiful die cuts, ink all the edges from all the papers you just cut, and use one of the text stamps from the Classic Message PreCut Set. Glue the papers together, but do not glue to the card yet. Before you glue it to the card, add a small piece of organza ribbon first at the left side of your card and choose a die cut you want to use for the right side. Cut the 2 little corners from the Classic Message PreCut Set and adhere them first to your card before you add your other papers. Cut and emboss some flowers from the Majestic Blooms Die and ink the edges of the flowers. Decorate your card with 2 flowers and some leaves and the flatback pearls and you are done:)


Project Instructions:
Other Products: Card stock (CS), vintage photo distress ink, hot glue gun, lace, black memento ink, ribbon, raffia, white acrylic paint

Instructions: For this project you need an empty soup can :) First I painted the outside of the can with white acrylic paint. Before you glue the outside paper cut a piece of paper first for the "inside" where the folded opening will be. (Ink the visible edge first.) Cut a piece of paper from the Majestic Morning Paper Collection, ink the edges, and adhere it around your can but do not glue the parts you need to fold. Fold the paper with your fingers or a tinsel. Glue some nice lace on the top edge of your can. Once dry, ink the edges again. For the bottom I used 2 sorts of lace. I first surrounded the bottom with brown lace and then with creme lace. Now you can cut and emboss several flowers from the Majestic Blooms Die and ink them with the Majestic Collage PreCut Set. For the leaves, I used the Delicate Asters Die and the Ornamental Add On Die. I also used two small die cuts, add them together with a small piece of organza ribbon, and glued them to the can. Decorate your can to your own needs :))


woensdag 22 januari 2014

Heartfelt Creations DT time again :))

This time I created a cute little drawerbox with card, made with matchboxes and chipboard using the wonderful Majestic Morning Collection. :)


Project Instructions:
Other products: Card stock (CS), vintage photo distress ink, acrylic flowers, pearlen pen, hot glue gun, lace, black memento ink, ribbon, matchboxes, chipboard

Instructions: For this project you need 4 matchboxes and 2 pieces of chipboard of 5,6 x 5,9 inch. Cut 2 pieces of paper and glue it to the chipboard( bottom and top)ink all the edges with vintage distress ink. Cut matching pieces of paper for the inside of the matchboxes and the sides. Glue them all and ink all the edges of the matchboxes. Glue the 4 matchboxes on the bottom of the chipboard and once dry, glue the other piece of chipboard on top of the matchboxes. Cut a piece of cardstock of 10 5/8inch and fold it this will be your card. Ink the edges first. Before you glue the card make sure you adhere a piece of ribbon first under your card. Cut a smaller piece of designpaper of the Majestic Morning Paper Collection and use the Majestic Morning Background PreCut Set. Before you glue it make sure you adhere the second piece of ribbon first( so this will be between your card and your piece of design paper)that way you can close your card by making a bow:) Cut and emboss several flowers using the Majestic Blooms Die and ink them with the Majestic Collage PreCut Set. For the leaves I used the Ornamental Add On Die. Decorate your card with the flowers, lace bow, leaves,die cut or anything you like :) For the inside of the card I made 2 triangle shaped pockets for the left and right so you can put a giftcard in it or money or anything small:)

woensdag 15 januari 2014

Recap of the Majestic Morning Collection

Recap of the Majestic Morning Collection 


Project Instructions:
Other products: Orange Card stock (CS), vintage photo distress ink, dusty concord distress ink, peeled paint distress ink, hot glue gun, lace, black Memento ink

Instructions: Cut a 6 x 6"card base from an orange cardstock. Cut a piece of patterned paper from the Raindrops on Roses Paper Collection slightly smaller than the base. Cut another piece of design paper in a triangle shape and place it in the left corner on top. Cut another triangle from the same patterned paper and adhere on the inside of your card so you can use it as a pocket. Cut and emboss some flowers from the Majestic Blooms Die and ink the edges of the flowers. Before placing all the decorations to your card first use the wonderful Majestic Morning Background PreCut Set stamp as a background. Cut and emboss the large edge from the Fleur de Lis Doily Accents dies and make it fit to your card. Cut the Fancy Lattice and use just a small piece to place on the left bottom corner. I also inked these edges. Choose some diecuts you like from the Raindrops on Roses Paper Collection and adhere them to the left. For the inside of the card Iused the Adorning Squares die, inked the edges and used a die cut again from the Raindrops on Roses Paper 

woensdag 8 januari 2014

New Release: the Majestic Morning Collection!

Finally it's there the first new collection of 2014:   the Majestic Morning Collection!

so much fun again to work with the beautiful materials :)))

For a very limited time Heartfelt will be be offering a card kit with this collection. See it Here

here's what I made for this week :))


Project Instructions:
Other Products: Brown Card stock (CS), vintage photo distress ink, hot glue gun, lace,

Instructions: Start by making a small box that fit the Post-it notes. Cut the cardstock 6" x 4", and score 1/2" in on all four sides. I used the Majestic Morning Paper Collection for both inside and outside the box. Patterned paper strips - 3/8" x 4 7/8" (x4), & 3/8" x 2 7/8" (x4). Inside the box I fasten the short paper stripes. Then make the box ready before adding the last paper stripes using the Majestic Morning paper Collection. This way it will cover up the tabs on the box. For the card - Start with a 12" x 6" cardstock. Find the middle of the cardstock, and score a 1/4" line out from the middle to both sides. This will make a 1/2" back on the card, and your card will stay flat when you close it. Now score a line in the middle of one of the large areas, and the shape of the easel is finished. Decorate all areas on the inside with patterned paper and do the same on the outside. Now it is time to make and decorate the front. My front is a 12,5 cm x 12,5 cm square(brown CS), but you can use any size and shape you like. Choose one of the designs you want to use and cut one of the beautiful Die Cuts and put lace around it. I use tape only on the lower part, and fasten the front to the easel. I use double sided tape to fasten the Post-it notes to the box, and the box to the easel.

NOTE: Since I could not find a post-it block with the right size, I used a small note pad book and adjusted the size of the box. Here is the original tutorial.


Project Instructions:
Other products: Some kind of triptych, spiced marmelade distress ink, hot glue gun, flatback pearls, lace, pearlen pen, black memento ink, HCD 702 Butterfly border die (disc.)

Instructions: This time I altered a MDF triptych using the beautiful Majestic Morning Paper Collection. As usual I inked all the edges of the 3 MDF parts with spiced marmelade distress ink. Then with a pencil I drew all the shapes and cut them out and also inked the edges of the paper. Cut from the Decorative Chateau Gate Die 3 windows and cut off the swirley top and ink the edges and use them on the left side of your triptych. Use the side swirls for the right side of the triptych. Cut from the Decorative Butterfly-Border Die the corner 1 time. Choose some Beautiful matching Die Cuts from the paper collection and place them anywhere you want. From the Beautiful You PreCut Set I used the 2 text stamps. Cut and Emboss flowers from the Majestic Blooms Die. It does not show very well on the photos but I sprayed the flowers first with glimmer mist and then layered the flowers. Decorate the triptych in any way you like.