woensdag 26 maart 2014

Heartfelt Creations Wednesday again :)


Products Used:
HCD 736 Classic Leaf Die
HCPC 3546 Classic Leaf PreCut Set
HCD 734 Sun Kissed Fleur Die
HCPC 3533 Sun Kissed Fleur PreCut Set
HCPC 3594 Time Sentiments PreCut Set
HCPC 3592 Timeless Clock PreCut Set
HCPC 3593 Numeral Clocks PreCut Set
HCD 744 Once Upon a Time Die
HCDP1 241 Once Upon a Time Paper Collection

Project Instructions:
Other Products: Creme and brown card stock (CS), vintage photo distress ink, lace, hot glue gun, black memento ink, ribbon.

Time Birthday Box Card Instructions: For this beautiful Birthday box card I bought the template from Sandras Scrapsels here, she has wonderful templates in pdf files AND SVG cut files, plus it is also in english and you can pay with paypal so not just for Dutch costumers. Since I unfortunately still do not have a Cameo I had to cut all the pieces with a scissor so it takes a little bit more time to finish such projects. Once I cut all the pieces, inked the edges and glued everything together I used the beautiful Once Upon A Time Paper Collection on every side I could use. For the inside box I used 3 clocks from the Once Upon A Time Die and glued them on the bottom right together. For the flowers I cut and embossed some flowers from the Sun Kissed Fleur Die and inked them with the Sun Kissed Fleur PreCut Set. For the leave I used the Classic Leaf Die and Classic Leaf PreCut Set. For the bow I used several materials and made a bow with it, with the mini bowdabra.

woensdag 19 maart 2014

Heartfelt Creations Wednesday again :))))))

I just loooooooooove the Once Upon a Time Collection!! So versatile and so great for even men projects :))
For this week I want to share a mini album I created with toiletpaper rolls :D


Project Instructions:
Other Products: Vintage photo distress ink, dewdrops from Robins nest, lace, hot glue gun, black memento ink, 3D foam pads, scrappers rope, bandage, clock charm.

Instructions: This time you are going to need 3 empty toilet paper rolls cause we are going to make a cute mini album. Of course they need to be flatten first (you could use something heavy). Choose 3 nice papers from the Once Upon A Time Paper Collection and cut them in the right size so you it fits the toilet rolls. Adhere the pieces of paper and ink the edges. Use a crop a dile or some other tool to make holes with and make holes right above the bottom of your paper rolls. You can also add eyelets if you wish. Cut out the 3 tags from your DP, ink the edges and also create holes in them. Add some nice eyelets. Before you tie the 3 paper rolls together with rope or ribbon, decorate the rolls first to your own needs. For the sentiments on the tags I have used the Beautiful You PreCut Set and the Classic Message PreCut Set. For the small flower I used the Sun Kissed Fleur Die.

Thanx for visiting again! :))

zondag 16 maart 2014

zwevend kopje/ floating coffeecup

just couldn't resist making this project. I have seen so many beautiful ones, so I thought I would give it a shot :)  and there will be more soon :D


woensdag 12 maart 2014

It's Heartfelt Creations Inspirational Wednesday again:)


Products Used:
HCD 736 Classic Leaf Die
HCPC 3546 Classic Leaf PreCut Set
HCD 742 Majestic Blooms Die
HCPC 3577 Vintage Morning Background PreCut Set
HCPC 3589 Brick and Clock Collage PreCut Set
HCPC 3594 Time Sentiments PreCut Set
HCPC 3592 Timeless Clock PreCut Set
HCPC 3593 Numeral Clocks PreCut Set
HCD 744 Once Upon a Time Die
HCDP1 241 Once Upon a Time Paper Collection

Project Instructions:
Other Products: Green and brown card stock (CS), vintage photo distress ink, dewdrops from Robins nest, lace, pearlen pen, hot glue gun, black memento ink, 3d foampads, scrappers rope, bandage.

Instructions: Start with a folded 5,5 x 5,5 size brown card base. Cut a piece of green cardstock slightly smaller than the base and ink with the Brick and Clock Collage PreCut Set. Distress the edges and ink the edges with vintage photo distress ink. Before you adhere the green cardstock cut 2 small pieces of DP paper first and attach to the left and right, also cut some bandage for under the green cardstock. Cut 2 smaller pieces of DP for the center of the card. Cut and emboss some clocks from the Once Upon A Time Die and use the Time sentiments Precut Set and the Timeless Clock PreCut Set and Numeral Clocks PreCut Set. Cut and emboss 2 leaves from the Classic Leaf PreCut Set and cut and emboss some flowers from the Majestic Blooms Die. Now you can decorate to your own needs. For the right I have used the dew drops from Robins nest. The butterfly was created by using the spellbinder butterfly die, I cut off the wings and used the flowers for making new wings. On the antennas I used pearlen pen. Choose of one the beautiful die cuts and place in the center of your card. Cut and emboss the doily from the Raindrops on Roses Die out of the DP paper, ink the edges and place in center of your die cut. Cut and ink the sentiment and place on your die. Cut and emboss several flowers from the Majestic Blooms Die and create lila and green flowers. I inked the edges with dusty concord distress ink and peeled paint distress ink. Cut and emboss the leaves 2 times from the Ornamental Add On Die and ink the edges with vintage photo distress ink. Place the flowers and leaves in both corners, adhere 2 flatback pearls and you are done.

maandag 10 maart 2014

woensdag 5 maart 2014

Explosion of Inspiration at Heartfelt Creations :)

This time I wanted to honor my fellow Design Team members at Heartfelt Creations. 
They all make so many stunning projects!!


Products Used:
HCPC 3551 Holly Berry PreCut Set
HCD 738 Ornamental Add On Die
HCD 726 Delicate Asters Die
HCPC 3494 Delicate Asters PreCut Set
HCDP1 240 Raindrops on Roses Paper Collection
HCD 743 Raindrops on Roses Die
HCPC 3587 Raindrops on Roses Window PreCut Set
HCPC 3584 Lady Rosalie PreCut Set
HCD 742 Majestic Blooms Die
HCPC 3578 Majestic Morning Background PreCut Set

Project Instructions:
Other Products: Brown and creme cardstock, vintage photo distress ink, hot glue gun, flatback acryl hearts, lace, bandage, black memento ink, glue.

Delicate Asters Exploding Box Instructions: You can follow these instructions to make your own beautiful exploding box. I had found another tutorial but can not remember where. Of course you can choose how big or small you want your exploding box to be. This is a link for those who like inches better. Before I layered and glued the 3 cross shapes I decorated them first on all sides with the Raindrops on Roses Paper Collection, and of course you should know by now I inked all the edges with vintage photo distress ink. For decoration you can use of course all kind of images, stamps and/or photos, I wanted to surprise my DT members with their photos in this exploding box. I added some bandage underneath the photos and yes I even inked all the edges of the photos. For the corners, I cut the doily from the Raindrops on Roses Die and cut it in 4 parts and placed them in the corners. For the center of the box, I used the Lady Rosalie PreCut Set. Add a flatback acryl heart in each corner for the finishing touch. The lid has been decorated with lace, a die cut with text from the Raindrops on Roses Paper Collection and flowers made with the Delicate Asters Die and Delicate Asters PreCut Set. The leaves are from the Ornamental Add On Die and the Holly Berry PreCut Set.

woensdag 26 februari 2014

New Heartfelt Inspirations again :))

This week I want to share 3 new projects with you :) I hope you enjoy them.
Thanx for visiting me :)


Project Instructions:
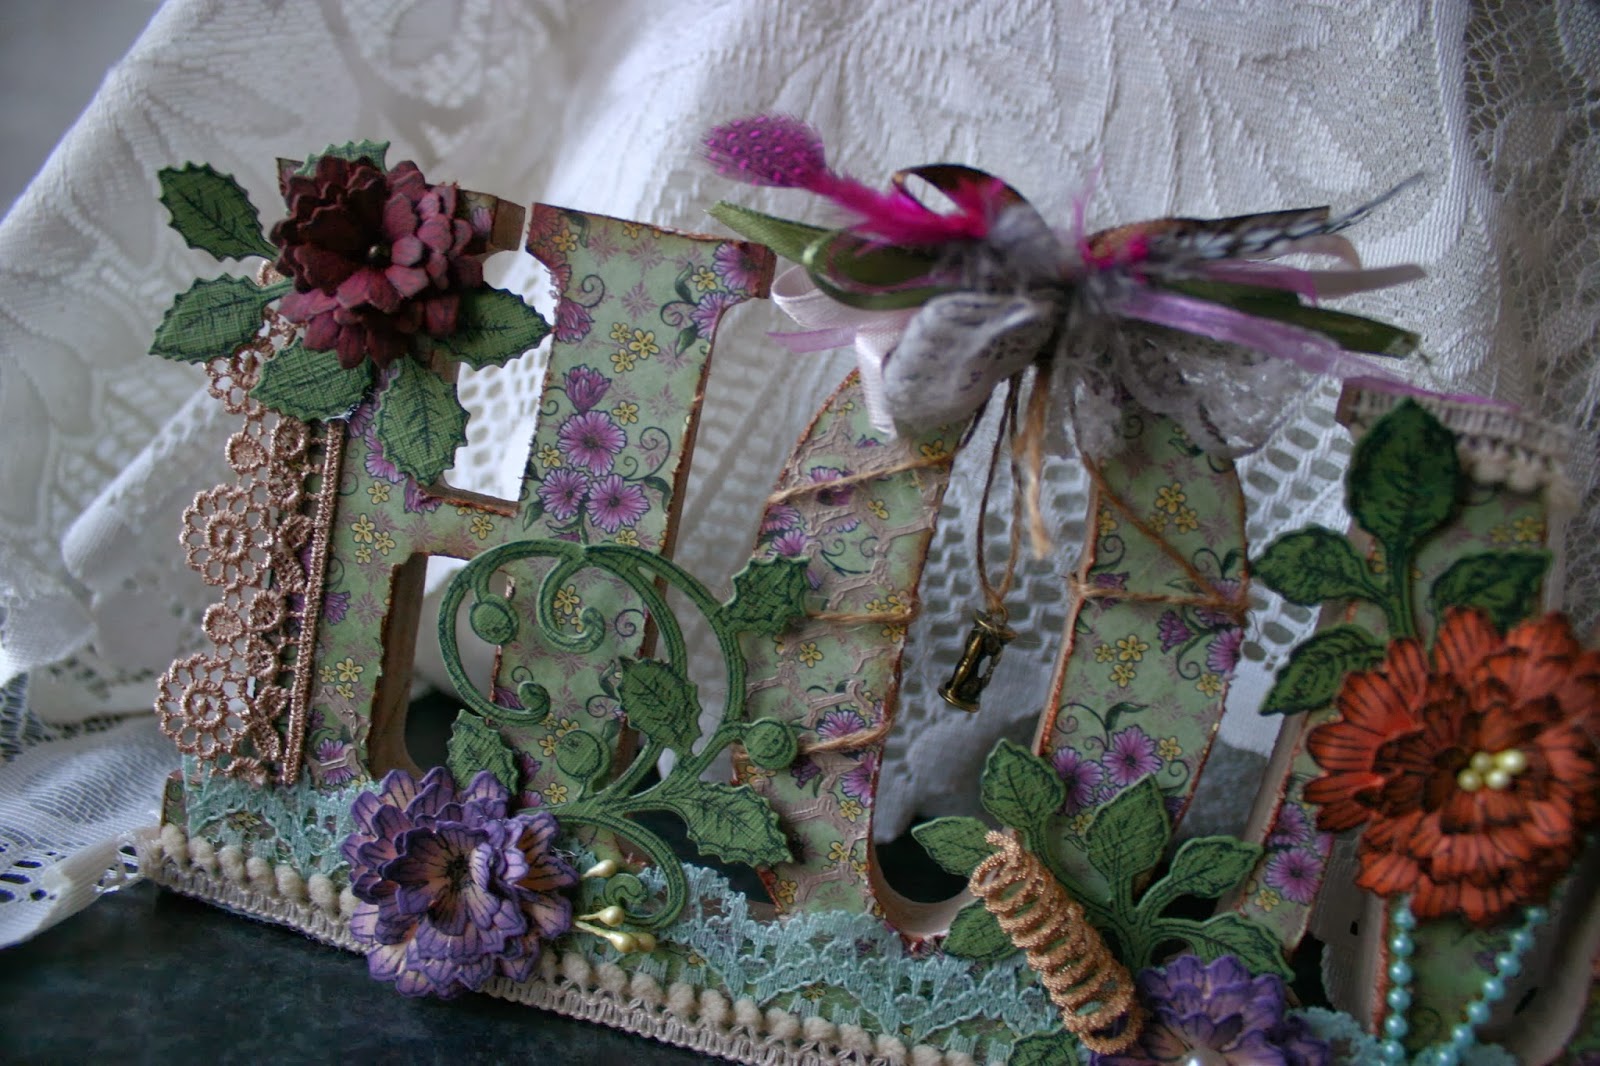
Other Products: Vintage photo distress ink, hot glue gun, lace, black memento ink, flatback pearls, pearl string, charm, feathers, organza ribbon, mini bowdabra.

Instructions: Click here to view a larger project image. This is an easy one this time. Just buy any MDF text you like from your favorite store and let your fantasy take over and decorate anyway you like. With a pencil draw the lines of the text you have bought/chosen on one of the lovely Raindrops on Roses paper and cut it neatly with a scissor/knife. I have distressed all the edges and inked the edges with vintage photo distress ink. Cut and emboss several flowers from the Majestic Blooms Die and ink the flowers with the Majestic Morning Background PreCut Set. Also the edges of the flowers have been inked just to get that special touch. Take different pieces of lace you like and decorate your text with it at several places. I used 2 sorts of laces for the bottom to create a layer. The bow was made using the mini bowdabra using different kinds of materials. Cut and emboss some leaves and ink them. Glue the leaves and flowers where you like them. Finish with some embellishments and one of the cute die cut texts from the Raindrops on Roses Paper Collection.


Project Instructions:
Other Products: Brown card stock (CS), vintage photo distress ink, hot glue gun, lace, bandage, flatback pearls, own made headpin.

Instructions: Start by making a base card from brown card stock 5,9" x 4,7" (15 cm x 12 cm) and ink the edges. Cut a piece of green patterned paper slightly smaller than the base and distress and ink the edges. Die cut the decorative Raindrops on Roses die, ink the edges and cut the die in half and use the first half to glue under the green patterned paper on the left. Use the other half for the right side to glue on one of your rectangles. Cut 3 pieces of decorative rectangles from the patterned paper put them in layers any way you like and adhere to the green layer with glue. Distress each paper you use and ink the edges. Place some bandage anywhere you like and glue the lace on top of the window. Then add the pearls with glue. Cut some flowers from the Delicate Asters Die and just ink the end of the petals. Ink the flowers with the Delicate Asters PreCut Set. Glue the leave first and add the flowers to you own need.


Project Instructions:
Other Products: Dark red and creme card stock (CS), vintage photo distress ink, hot glue gun, glue, brads, metal embellishment corner, ribbon, eyelet.

Instructions: This time it is time for a waterfall card. Start by making a base card from dark red card stock 5.9" x 4.1" (15 cm x 10,5 cm) and ink the edges. Cut a piece of creme card stock slightly smaller than the base and ink the edges. Choose one of the die cuts from the Raindrops on Roses Paper Collection and make it slightly smaller than the creme cardstock. Ink the edges. Cut another piece of creme card stock slightly smaller than the base and ink the edges and glue it to the back of your card. For the back of the card I also used one of the die cuts from this beautiful paper collection. Make sure it is slightly smaller than your creme cs. Cut a strip of card 3.7" x 0.87" (9 cm x 2 cm). Cut 4 square pieces of creme cardstock slightly smaller than your strip of card and ink the edges. Cut 4 of the square die cuts from your Raindrops on Roses Paper Collection and make them fit for the creme squares, ink the edges. Cut a strip of card 1.95" x 9.4" (5 cm x 24 cm). Use an embossing tool and ruler or score board to create 4 fold lines (0.87") on the largest area remaining I used the Raindrops on Roses Birthday PreCut Set. For the inside of the card I cut 2 pieces of creme cs and design paper from the Raindrops on Roses Paper Collection for decoration. For further instructions you can follow the tutorial here to create a waterfall card. The fun part is you can make it vertical or horizontal. I decided to make a vertical waterfall card.